Thursday, February 28, 2013

March Class Share!

Hello!  You haven't seen me in a couple of days because I was busy getting my class kits done and yesterday teaching my first of two classes this week.  On a good note, I did get the next class samples done, and so I want to show you them today.  I normally don't do the next class samples until after the previous month's classes, but since I will be gone next week, I wanted to get them done now.  I love how they came out.  Let me show you ... enjoy!
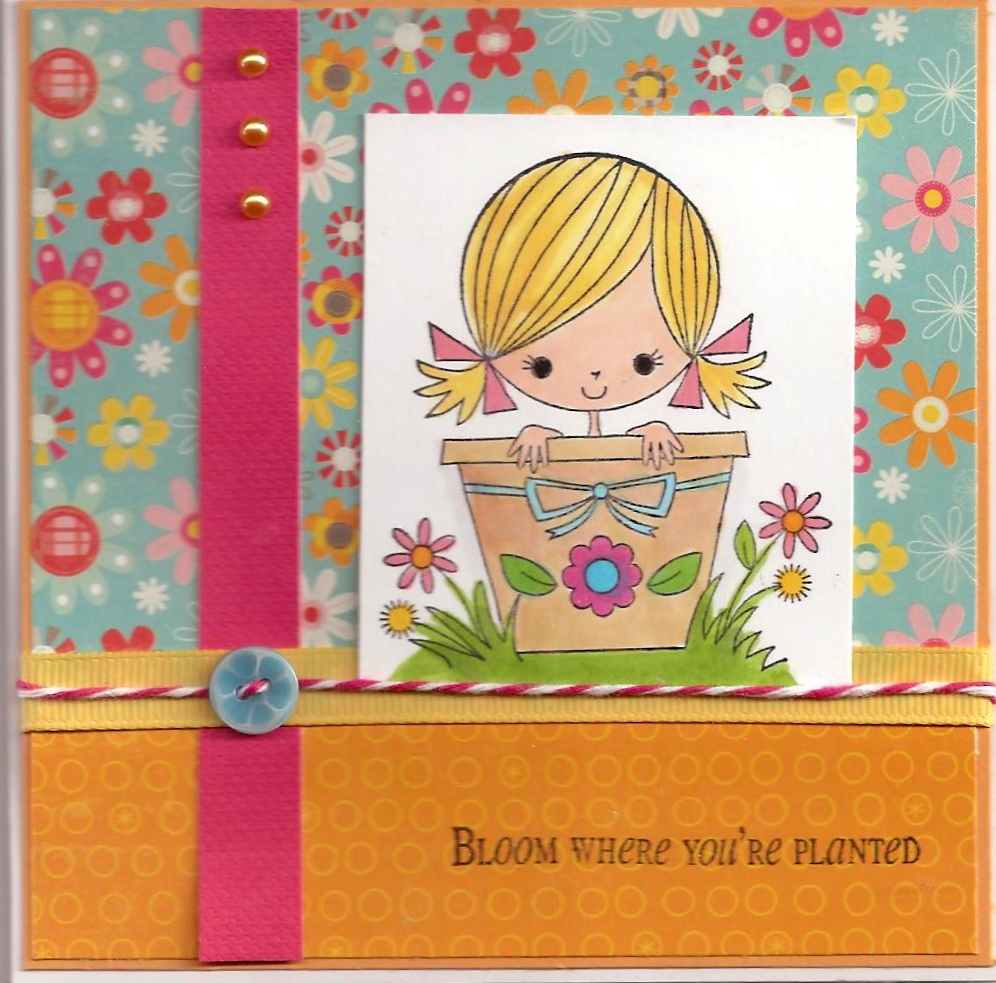
 
 
Card 1 Front


Card 1 Pop Up Easel
Card 2 Triangle Card Front


Card 2 Triangle Card Open

Card 3 HoneyPop Front
Card 3 HoneyPop Open
My theme for this month is Celebrate Spring.  I think these three do just that!  So, here is the class details, in case you are interested.
Celebrate Spring! Wed. March 27th 11:00 a.m. and Friday March 29th 7:00 p.m.
We are celebrating Spring with three creative and unique cards. On all three, the insides are just as awesome as the outsides, as one is a unique easel type card, a diamond fold card, and a honeyPop card with a vase and flowers. Please bring adhesive to include pop dots and a glue stick, detailed scissors, and your preferred coloring medium. All other supplies provided. (copic colors I used: card 1:B657/G43, Y15, YR16, YR18, Y38, Y11 card 2: RV32/RV34, YR31/Y15, BG10/BG57, G94/G99 card 3: Y08/Y38, BG10/BG45, YG13, RV10/RV14 ...these are listed only for the convenience of those who have asked me to share the colors I used.)

Since I have mostly gone to using copics to color, several ladies in the class, have asked that I let them know ahead of time what colors I used, so they don't have to bring their whole collection to class.  Of course, they know me and know I typically use one to two colors instead of the three color combo that is taught in most copic classes.  I have always said that the "coloring police" might be after me for the way I color!  Hee, Hee!  And that was even before I started doing copics.  Reality is that there are NO RULES in this hobby and also no "coloring police" ... thank goodness!


I have enough cards to show you one a day through the next week, BUT I have to get the posts written to go with the card pics.  And you know me, I am long winded and so that takes some time.  We'll see how it goes.  Right now, I am off to figuring out what I am taking on our cruise next week.  I know what you are thinking ... another cruise?  I think I talked about it on Facebook but I don't think I have here.  Here's the short version ... my hubby has a music hobby, a huge collection of lp's, 45's, cd's etc. etc.  He also buys and sells to make money to buy more for his collection, or in this case, do something special.  You see he bought a 45 at an estate sale for $1 and sold it to a dealer that deals only with rare records for $1500!!  And that is what is paying for this cruise!!  Just FYI: the 45 was from the late 50's and the group on it said The Teen Kings, which was Roy Orbison's garage band before he became famous, plus the 45 was in near mint condition!  This is the most he has ever made on one record.  He has many records in his collection that are worth a pretty penny, but this by far, brought more than the others would.  I am just happy he would part with it, and take me on a cruise. 

See you soon!
Happy Stamping!
Tina

Monday, February 25, 2013

Land of the Free Because of the Brave!

Hello!  I have a patriotic card for you today.  My friend Donna, is a member of Blue Star Mothers, and every three months they pack up all kinds of stuff to send to our troops.  She likes to have cards made that everyone in the group can sign and put in each of the boxes.  So, she needs to make about 30 cards.  That is where I come in ... two crafters are better than one, when you need 30 cards!  They came out great ... let me show you!  


On the inside, we both normally like to add colored panels, but we decided to just stamp the sentiment, right on the card, to save both time and paper.  It looks great since my stamp set came with the star frame border in the set.  What do you think? 

Recipe:
Paper - Designer Paper from Jo-Ann's, Cardstock White, Red, Dark Blue
Stamps - Verve Hero set
Ink - Versafine Majestic Blue
Tools - Spellbinders Star Circle, Classic Circle, Star Embossing Folder by Darice
Other - Red/White & Blue Stripe Ribbon from Jo-Ann's

I am in the middle of my class prepping, so I will have to see how it goes.  I have cards to show you but I have to get the time to write out the post.  See you soon!

Happy Stamping!
Tina

Saturday, February 23, 2013

Saturday's Sketch Share!

Hello!  I am back with another sketch share between Debbie and I.  This week is one of the those sketch choices between a circle and a square.  For months and months, I almost always did the circle choice, but then the last couple of times, I have gone with the square choice, but I have made it a small square.  Today, I am going a full size square! Mainly this happened as I picked out an image I wanted to use, and it wouldn't fit on the smaller square, so I had to go big!  Debbie, on the other hand, usually does squares, but this week, went with the circle choice!  Let me show you our cards.  First mine, and then Debbie's, and then the sketch we both used.  Enjoy!
 
Tina's Card
Debbie's Card
The Sketches
One day on the phone, Debbie and I were talking about how it is o.k. to flip a sketch, if it will work better for you.  She did that on her card today!  Love it!  I love the brightness of my card, the image and the new paper pad.  What do you think of today's cards? 

O.k. I promised I would give you a full report today of the Scrapbook Expo convention I went to yesterday.  It was smaller than the Great American that is usually in May or June in Arlington, but it wasn't as small as the stamp conventions are.  It was at the Gaylord in Grapevine.  We thought there were not enough signs to show you where to park or how to get to the show.  The convention center is a big place, yet the booths were close together and with lots of people, it gets crowded.  I know I have heard that folks think the Great American has so many booths of just deals, where there is a lot of discontinued items being sold for cheap.  There was still some of that at this one.  I was surprised that there were quite a bit of booths with stamps.  We did not stay all day, but I could have made another round, but both my pocketbook and friends were ready to go!  We'll see if they come back.  They probably will, and if what we are hearing about the Great American show going to combine the scrapbooking show with a sewing show, probably more vendors will come to this one instead.  We'll have to wait and see.  All in all, I enjoyed it, as I always run into people I know and haven't seen in a while!  And I always enjoy spending time with friends!

My hubby and I are leaving on a cruise a week from today.  I have enough cards ready to show you through most of next week.  The issue will be for me to have time to do posts for them all.  We'll see how it goes.  I am also teaching my two classes this week in Waxahachie.  And I still have a few things to finish up in my room also.  We'll be a busy week, for sure.  Hopefully, you will see me on Monday with the next card!

Happy Stamping!
Tina

Friday, February 22, 2013

Fluttering By!

Hello!  Today's card is a case from Pinterest.  I had to track it down to find the original post, so go here to see it.  Love Pinterest, but it does get irritating when you click on the pin and it does not take you to the corresponding post and then you have to spend time trying to find the right one.  Fortunately, her card was a birthday card and so I went to the birthday label, and finally found it, but as you saw her card was posted a year ago.  Anyway, love her card and even though mine, is somewhat different, I love it too!  Let me show you ... enjoy!
 

I went with the straight edge squares to make it easier on me since I have a 1" punch (thanks to my good friend Eileen!).  The paper you have seen from me before, but it has been a while.  When I saw I needed coordinating colors, I went to my stash of 12 x 12 dp to find this sheet, as it is one sheet with a bunch of squares and rectangles.  Made it easy, I just punched my squares out of this one sheet.  What do you think?  It is different from my usual sketch style, but it's nice.

Recipe:
Paper - Little Yellow Bicycle Zinnia Flower Patches (2008), Cardstock - Green, Purple, White
Stamps - Sentiment from Rubbernecker Butterflies are Free set
Ink - Versafine Black

Tools - Spellbinders Classic Oval, Lacey Oval, Stampin' Up Butterfly embossing folder (they have a name for it, sorry don't remember)
Other - Rhinestones, Ribbon from Creative Impressions

I am right now at the Scrapbook Expo up in Grapevine.  Will give you the full report tomorrow in the Saturday Sketch share post. See you then!


Happy Stamping!
Tina

Thursday, February 21, 2013

Victory is Mine!

Hello!  I have another inspirational card for you today.  I think of the inspirational cards you have seen this week, this one is my favorite!  Besides the colors, which when you see the card, you'll agree, the layout is great too!  Let me show you ... enjoy!


See how pretty?  I love this one.  That embossed panel under the sentiment oval is awesome.  A while back, I ordered some embossing folders from Lifestyle Crafts from one of those bargain sites that send you "steals" every day, and this was one of them.  I really need to do another card that really shows this folder off!  Do you love this card?

Recipe:
Paper - Echo Park For The Record 2, Cardstock
Stamps - Verve Beautifully Made set

Ink - Memento Black, Copics
Tools - Lifestyle Crafts Quickcutz Blossom embossing folder set, Spellbinders Petite Oval
Other - Rhinestones, Ribbon by May Arts

Most of the cards you have seen this week, and a few of the cards you will see next week, are in the group of cards that I made especially for a couple of ladies at my church who asked me to make them cards for them to send.  Well, yesterday, I met up with one of the ladies.  This lady's daughter donated all of her stamping goodies to me a few months ago.  I guess she was into it in 2003 but since then it had been collecting dust, so she wanted to donate her stuff to me.  In all honesty, there was some good, but some that I will probably try to sell at the next garage sale that The Crafty Scrapper has (March 23rd).  Anyway, I had promised a group of cards to her daughter for payment, but with the holidays, I had put it on the back burner.  It really has been bugging me to get this taken care of.  So, I went through all my available cards and took 30 with me to meet the mom.  I had her pick out 10 for the payment to her daughter and then if there were any she was interested in, she would purchase those.  She got 12 for herself!  Which is awesome!  She paid $50 for those, which means I am getting a pedicure!  The only problem is that now, I have few in my "I need a card really quick, let me just get from my stash"!  And, I don't feel like I have enough nice ones in the 8 cards she left to sell to the other lady at church.  So, I will be working on some more cards, but it won't be next week, as that is my teaching week, and it won't be the following week, as I am off on another cruise, this time with my hubby.  Well, thanks for listening to my long conversation! 


Tomorrow, I will be off to a scrapbook convention, which is up in Grapevine.  This one is Scrapbook Expo, which is the first time they have come to the metroplex, so not sure what it will be like.  I will give you the full report on Saturday.  Don't worry I have the tomorrow's post all ready for you, so stop back by tomorrow to see my next creation.

Happy Stamping!
Tina

Wednesday, February 20, 2013

Butterfly Thoughts!

Hello!  Today's card is another inspired by Pinterest card.  Go here to see the original card I cased.  I just looked it up and it seems I pinned it a couple of months ago, but that is what is great about Pinterest, the cards are always there waiting for you to give you ideas!  I came across in a memory box package of 6 x 6 sheets a really pretty paper with butterflies and thought well, I need to find a butterfly sketch to go with the paper.  So simple, but pretty.  Let me show you ...enjoy!


See what I mean?  It is not my usual type sketch, but I like it.  It really shows off the pretty paper! 

Recipe:
Paper - Memory Box Minuet 6 x 6 package, Cardstock Purplish Blue, White
Stamps - Sentiment is Verve from Borderline set, Butterflies are Hero Arts Butteflies & Die Set

Ink - Memento Black, Copics
Tools - EK Successd 1 3/4 inch circle punch, Hero Arts Die Set
Other - Rhinestones

See you tomorrow with another creation.

Happy Stamping!
Tina

Tuesday, February 19, 2013

You O Lord!

Hello!  I have another inspirational card for you today.  Let's get right to it.  Enjoy!


This clean and simple card was inspired by a card I saw on pinterest.  Adding all the pearls makes it alot more special.  Then I wanted some kind of flower or embellishment on top of the swirls, and I found this metal flower in my fancy button box.  Perfect!  What do you think?

Recipe:
Paper - Teresa Collins Fabrications 6 x 6 pad, Cardstock Light Grayish Blue, White
Stamps - Verve Plain Jane
Ink - Versafine Black
Tools - Spellbinders Romantic Rectangles, Stampin' Up Scallop Border punch, My Favorite Things Fancy Flourish Die-namics
Other - Pearls, Metal embellishment from Bo Bunny (I think)

See you tomorrow!
Happy Stamping!
Tina

Monday, February 18, 2013

Amazing Grace!

Hello!  I have been very busy in my room trying to make cards for a couple of the ladies from my church that are wanting to purchase some cards from me.  They asked for some get well (and birthday) cards, but looking through my sentiment stamps, I have many more spiritual sentiments than get well.  I figure if I do the spiritual ones that they will work for get well, thinking of you and maybe even sympathy, if needed.  I have made enough cards between these and some others, that you should see a card a day from me for at least two weeks!  Let me show you today's card ... enjoy!


I believe I made a similar card last year, probably why it was in my head, but this one is different papers, and embellishments.  So, pretty but still so simple!  What do you think?

Recipe:

Paper - Teresa Collins Fabrications 6 x 6 pad, Cardstock Light grayish blue, White
Stamps - Verve Plain Jane Amazing Grace
Ink - Vesafine Black
Tools - Spellbinders Petite Oval, Petite Scallop Oval
Other - Grosgrain Ribbon, Lace Trim by My Minds Eye, Rhinestone Swirls (from my stash)

See you tomorrow!
Happy Stamping!

Tina

Sunday, February 17, 2013

With All My Heart!

Hello!  Today I have one last Valentine card to show you.  It is quite simple but adorable.  Here it is ...enjoy!


This Pure Innocence girl holding the heart is a favorite and I couldn't resist using it again this year.  Last year when I used her in a class, I paper pieced her dress and her heart.  I kept it simple and just colored her with my copics to match the pretty papers I used.  Love it, don't you?

Recipe:
Paper - Crate Paper Fourteen Line "Cupid" (both sides), "Love" (floral), Cardstock Natural White, Pink (My Minds Eye)
Stamps - My Favorite Things Love You with All My Heart PI, Sentiment from Avocado Arts
Ink - Memento Black, Copics

Tools - Spellbinders Petite Oval
Other - Twine by The Twinery, Heart Rhinestones, Rhinestones by Queen & Co.

This last week I worked on several cards to sell to the couple of ladies at my church who asked me to make them a collection of cards, so I have enough made at this point to show you a post every day this next week!  Special treat for you!  See you then!

Happy Stamping!
Tina

Saturday, February 16, 2013

Saturday's Sketch Share!

Hello!  I am back today with the Saturday sketch share.  If you have been reading my posts the last few days, you know my card is another Valentine.  Love both the cards today.  So, let me show you.  My card first, then Debbie's and the sketch we both used.  Enjoy!
 
 
My Card

Debbie's Card

The Sketch
I have to say, this sketch needs to be added to the go-to list.  Now, it isn't one that would work every time, because the space to add images are small, but for the times when you just have two to three small images, it is perfect.  Thoughts?  Don't you love both the cards today?

See you tomorrow for the last of my Valentine creations.  And then all next week, I will have posts of new cards to show you too!  I am on a roll! 

Happy Stamping!
Tina

Friday, February 15, 2013

Vintage Valentine!

I almost forgot to do today's post.  I have another Valentine for you but this one is way out of my box!  Sometimes you see paper that is perfect for someone you know.  That is the way it was when I saw this vintage Valentine collage paper, so I got a sheet of it with thoughts of trying my hand at a shabby, vintage type card for my friend.  I see so many of these on blogs and pinterest and they are always so pretty, but I think they look hard for me, since it is really not my style of cards. I think I might have pulled it off, so let me show you my card and you can be the judge.  Enjoy!


I combined a sketch, which as you know, I always have to start with, and added papers, hearts, lace, ribbons, a paper flower, and hat pins.  What do you think?  Would love to hear from you on this one, for sure!

Recipe: 
Paper - Reminisce Cupid's Arrow (this is the vintage paper I got for my friend), Authentique Lovely Collection "Dearest" (this is the red/white paper that has the lace print on it), Cardstock Natural White, Red
Stamps - Sentiment from Stampin' Up
Ink - Versafine Black
Tools - My Favorite Things Tag You're It (I cut it a little at the bottom to make it fit better), Spellbinders Classic Heart, Splendid Circle, Stampin' Up Square Lattice embossing folder
Other - Lace (2 widths found at a garage sale for cheap), Ribbon by Midori (seam binding from my ex-store's stash), Hat Pins from Maya Road, Paper flower (Maya Road?)

I'll see you tomorrow for the Saturday sketch share!
Happy Stamping!
Tina

Thursday, February 14, 2013

Love Monkey Spinning!

Happy Valentine's Day!  Today's card is a CASE from one of my favorite bloggers.  I had to go back and find her card on her blog, and I was surprised when I found her card was from 2010. You can see it here. Wow!  That means I have had the idea in my head and on my list for three years!  I am so glad I finally made the card!  The stamps, I got last year from a friend that was clearing out some of her unwanted sets and I bought this one, with this idea in mind!  My colors are different, but it's pretty similar in every other way. Thanks Susan for your inspiration!  Let me show you mine.  Enjoy!    


And for a little monkey spinning action ...


In case, you don't know how to make a monkey spin ... you just cut a track out of your paper  The best thing to use for this step is the word punch from Stampin'Up.  Makes it super simple.  And then you take two pennies, add a foam dot between the two and glue one penny to the back of your monkey.  Then when it is put in the track, it freely spins ... crazy monkey!  You might remember last year, one of the cards I did for the Inky Antics guest designer and then also for a class card,  I did a slider card.  Same idea but I added another set of pennies, so that instead of spinning it slid along the track!  I haven't done a spinner in a class, but I probably will at some point.  Oh, one more thing, make sure you pop up the cardstock or pattern paper sheet that has the track on it, or there will be no room for the spinning.  I shouldn't tell this, but when I first made my card, I did remember to pop up the paper but what I didn't do right, was I added pop ups too close to the track so it couldn't spin ...duh!  I had to take it apart and fix this ... which wasn't easy, as I had used scor-tape for this part.  So, make sure you do it right the first time!  Just add pop-ups at the corners and somewhere in the middle, not next to the track! 

What do you think?  Makes for one adorable and fun Valentine's Day card?

Recipe:
Paper
- Bo Bunny Crazy Love 6 x 6 (this is from either last year or the year before), Cardstock White, Brown, Pink
Stamps - Verve Love Monkey
Ink - Memento Black, Copic
Tools - Spellbinders Classic Circle, Classic Scallop Circle, Stampin'Up Word punch
Other - Pennies, Ribbon by Creative Impressions

Remember, I have Valentine's to show you for the next three days.  See you tomorrow with one that is totally out of my box or at least different than my normal style. 


Happy Stamping!
Tina

Wednesday, February 13, 2013

Froggy Valentine!

Hello!  As I mentioned in yesterday's post, I have enough Valentines to show you one a day through Sunday.  Yes, I know in a perfect world, all of these would have been finished last week or before, and so you would see them all before Valentine's Day, but ... well, it is, what it is!  I am showing you the one I made for my hubby today, so that the other recipients have time to get theirs before I start putting them here for all the world to see.  Today's card is silly, but cute.  Let me show you.  Enjoy!
 

My hubby and I have this frog thing.  Not sure where it started, but we have frogs sitting around the house, plus, he loves green .. hence the green frog on my otherwise red card!  Simple but cute!  What do you think?

Recipe:

Paper - Authentique Lovely Collection, My Minds Eye Remarkable Collection (Both the green dot and the red dot are the exact same type of paper but yet from totally different companies... wierd!), Cardstock Cream, Red
Stamps - Frog is from Endless Creations, Sentiment from Avocado Arts

Ink - Memento Black
Tools - Spellbinders Classic Circles, Classic Hearts, My Favorite Things Mini Scallop Edging border Die-namics
Other - Red Twine, Red hearts from Queen & Co.


See you tomorrow!
Happy Stamping!
Tina

Tuesday, February 12, 2013

February Class Share!

Hello!  Saturday, I was saying that last week I had been in a creative rut ... I am so happy to say, my creative mojo is back!  This allowed me to get the class samples done for my class which is later in the month and also, several Valentines.  So, this week, I will have a post for you every day through Sunday so I can get them all in.  You won't mind a few Valentine cards after Valentine's Day has passed, will you?  First things first, let me share today with you my February class cards.  It is all about Easter.  I know you are thinking, Easter already?  But, because my classes fall late in the month, and Easter is late March this year, I had to do Easter now.  I love all three cards.  Last month, one of the cards was a swinging Z-fold.  This month I have two variations of the Z-fold and one honeyPop card, of which I have taught so many times, but we keep doing them because ... well, they are just too darn cute not to!  Let me show the cards ... enjoy!
 
 
Bunny Love Z-Fold Front

Opening

Totally opened

He Has Risen Double Z-Fold Front 

Opened

Duck HoneyPop

HoneyPop Opened
What do you think?  Don't you love how all three came out?  Here are the class details, in case you can come or in case you want a kit ...

Happy Easter - Wed. Feb. 27th 11 a.m. and Friday, March 1st 7 p.m.

Come make three Easter cards, all unique and creative. Two cards are variations of Z-Folds and one has the inside honeycomb pop in brand new sherbet colors. Please bring adhesive to include a glue stick and a X by Xyron (if you have one), detailed scissors, and your preferred coloring medium (colored pencils, Copics, etc.) All other supplies are provided.
(copic colors I used: card 1: E31, E33, YG25, YG63, C0, B000, R81, YR02, BV13, Y02, card 2: G21, G28, Y11, Y15, BG10, card 3: Y02, Y38, G000, YG11, R81, V20, B000, YR00 ...these are listed only for the convenience of those who have asked me to share the colors I used.)

See you tomorrow with one of the Valentines.
Happy Stamping!
Tina

Saturday, February 9, 2013

Saturday Sketch Share!

Hello!  I am back with another sketch share.  This week, both Debbie and I did cards with Valentine's Day in mind.  Let's get to it.  I will show you my card, Debbie's card and the sketch we both used.  Enjoy!
 
My Card

Debbie's Card

The Sketch
Do you like the sketch this week?  I have to say it is not my favorite, but once I got started, it did come together pretty easily.  Getting started was the issue for this week, as I was definitely having a non mojo creative week.  I needed to do my next month's class card samples, had trouble and so they are not finished yet!  And then, I needed to send two birthday cards to two friends I have known for 50 years, and 40 years, and I had trouble with them.  Those two I finally just picked the two best birthday cards from my own stash of cards and got them in the mail.  Also, on my list is to finish the collection of cards for a couple of ladies from my church that want to buy some of my cards.  I had lots of ideas for Valentine cards, but you haven't seen those here either.  Lots to do, hopefully, some good mojo creativity is back and I will get to it!   O.k. back to the card, I want to comment that I have all kinds of new stamps, and what did I use here?  An Hero Arts set from when I had my store.  But it is perfect for it!  The red/white paper is tissue paper that I got on a clearance rack at Target.  Perfect for owls for Valentine's Day!  I love Debbie's little test tubes and her sentiment Love Potion #9!  So cute!

See you soon!
Happy Stamping!
Tina

Saturday, February 2, 2013

Saturday Sketch Share!

Hello!  You almost didn't see me, as I forgot I had not gotten this post ready for you.  I was walking out the door and realized, so this one will be short and sweet!  I will be showing you my card, Debbie's card, and the sketch we both used.  Enjoy!
 
My Card

Debbie's Card

The Sketch
Love the sketch.  Love the cards.  What do you think?

See you next week!
Happy Stamping!
Tina

Friday, February 1, 2013

Home Sweet Home Part 2: 6 Creations!

Hello!  Last week, I showed you a house card that I made to sell to my realtor.   Here is the link to that post.   She wanted to purchase 6 cards, but asked if I could make them in different colors.  I started working on them late last week but then had to put them on hold to work on my class kits.  Speaking of my class, between Wednesday's class and tomorrow's, I have 17 sign-ups!  Awesome!  Now, back to the house cards ... it took me a little time because I originally thought I would be making them all alike, but with making them different, I spent a lot of time gathering papers, cardstock and embellishments for each color theme of the house.  It was fun, but a little tedious.  So, without further ado ... let me show you the home sweet homes, all 6 creations ... enjoy!


Below is the original one.  The only change I made is to snip the roof line on the base card to match house roof.  I like it this way much better.  If you went to original post, you can see the difference.


I do want to give you the measurements here for this center step card.  It is an A-2 size, however with the embellishments, it is a little bulky, so I am giving her some 4 3/4" x 6 1/2" envys to go with them.  O.k. so the card base is 5 1/2" x 8 1/2" (regular fold-over size).  You line up the cardstock at 7/8" from the edge and make a cut from 1" to 6".  Do this on both sides.  Then score across the card at 4 1/4" and then only up to the cut line at 1", 1 1/2", 3", and 6" on both sides.  And then you just make your folds and decorate.  Very easy.  The hardest part was deciding the colors. I do want to note a couple of added items on the latest ones.  I added a piece of acetate behind the windows to look like glass.  Here is a close-up. Can you see?

And on two of them, I made bricks using the Tim Holtz brick embossing folder.  I promised from the previous post that I would give you a recipe list.  I can do so for the tools, but papers ... no, as I went thru every one of my 6 x 6 pads to find prints and colors that would work together.  So, here is the important recipe stuff:
Madison House die set by Poppystamps
Fence die by Taylored Expressions
Flower die by Poppystamps (single flower on left)
Grass die by My Favorite Things (used on pink card)
Brick embossing folder
Flower Soft
Prima Flowers
Rhinestones - asst.
Lots of scor-tape! Also, foam mounting tape, and glue for flower soft.

How did I do?  Do you love them?  I told her $20 for the 6.  Probably should have tried to get more, but my thinking, was not to make them too high, so that she might order more.  Love to hear what you think about my little houses!

Tomorrow is the Saturday sketch share, so stop back by for that.
Happy Stamping!
Tina


design by suckmylolly.com