Saturday, January 28, 2012

Saturday's Sketch Share!

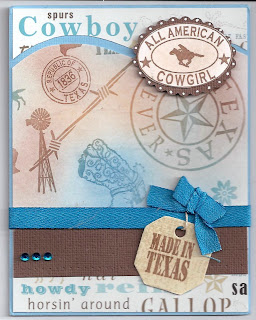
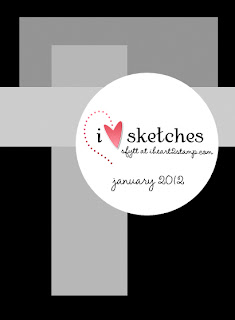
Hello!  I am back today with another share.  This is one of the week's where we had a choice between a square and a circle.  Let me show you.  You will see my card, Debbie's card, and the sketches.  Enjoy!


My Card

Debbie's Card

The Sketches

I rarely print a sentiment on my cards because I don't have pretty handwriting, but I really wanted to say something from the "love bandit", so I wrote it small on the ric rac border.  I like it, actually!  What do you think about this week's share?

I will see you next week. I am off to The Crafty Scrapper to teach today! 

Happy Stamping!
Tina

Friday, January 27, 2012

Fluttering By!

Hello!  I have a card to show you today!  Woo Hoo!  There is a lady at my church who is turning 90 and they wanted everyone to bring a card for her on Sunday.  Yes, I do have many already made that I could give her, but I decided to make one instead.  At least that way, I have another post for you!  So, let's get to it!  Enjoy!

I got to use a new set of papers, a new flourish die and a butterfly from the set I am teaching with this week at The Crafty Scrapper.  The set is one of the Hero Arts sets that has matching dies that cuts out the stamp after it is stamped and as you can see, it does I great job!  The funny thing about this set, is that Carolyn, the owner at the store, said I could just use one of the sets for my classes and not have to buy it.  But guess what?  After using this set, I want it!!  Maybe she knew that would happen!  In the set, there is even a smaller size butterfly that I really love.  I used the middle size on my card today. The layout is a recent sketch that I had planned to enter the challenge on, but I didn't get to it, but I could just see these elements working with the sketch.  Here is the pic of the sketch.  Better late than never!

What do you think?  It really is a great sketch ... which made such a pretty card!

Recipe:
Paper - My Minds Eye Six by Six Vanity Fair, Cardstock White, Pale Green, Wine
Stamps - Sentiment from Rubbernecker, Butterfly from Hero Arts Stamp & Die set
Ink - Memento Black, Prismacolor Pencils, Gamsol
Tools - MFT Die-namics Fancy Flourish, Spellbinders Classic Circles & Classic Scalloped Circles, Cuttlebug Musical Flourish embossing folder
Other - Rhinestones & Pearls by Queen & Co., Ribbon by My Minds Eye

I will see you tomorrow for the Saturday sketch share!

Happy Stamping!
Tina

Wednesday, January 25, 2012

Happy 50th!

Hello!  A very good friend of mine and her husband celebrated 50 years of marriage a couple of weeks ago.  I was hoping to see her at the last stamp convention, so that you could see my card here last week, but I didn't get to give it to her until this last weekend.  Now, I can show you!  My other friend, Eileen, gave me the idea to use the birdcage die in gold.  (thanks Eileen for the great idea!)  I did just that and made a joy fold card, as I figured any couple that can make 50 years, is definitelyy a Joy!  I have several pics to show you, so let's get to it!  Enjoy!  

Front with card closed

Opening card

Card Opened


I love how the whole card came together.  The sentiments were printed on the computer.  Sometimes, you just have to do it that way!  I wasn't sure at first about using the pattern paper on the front, but I could not find enough of the gold cardstock to make it work.  In the end, I love the contrast and I think it totally makes the card.  How do you like the card?  Oh, one more thing ...Congratulations Virginia and Bill!

Recipe:

Paper - Die Cuts with a View Luxury stack, Cardstock White, Gold Glossy Stripe, Gold Shimmer
Stamps - My Favorite Things Contempo Cage set
Ink - Memento Black
Tools - Spellbinders Hearts & Labels 4, My Favorite Things Contempo Cage and Tab Die-namics, Stampin' Up border punch
Other - Rhinestones

I am not sure if I will have anything else for you for the next couple of days, we'll see how it goes, but I will be back for sure on Saturday for the Sketch share. 

Happy Stamping!
Tina 

P.S. Quote of the day:  "What we are today comes from our thoughts of yesterday, and our present thoughts build our life of tomorrow:  Our life is the creation of our mind".    - Buddha

Tuesday, January 24, 2012

Make Today a Beautiful Day!

Hello!  I am right in the middle of prepping for my classes at The Crafty Scrapper this week, but I promised I would do a couple of posts for cards that were sent but I haven't shown you.  So, today I have one, and I will do a post for the second one tomorrow.  The first one I made for a friend and I used a sketch from My Favorite Things which I need to link up soon as the deadline is in a couple of hours.  So, let's get to it.  I will show you the card and the sketch.  Enjoy!


Sorry the sketch pic is fuzzy.  I don't know why it did that.  But, I think you can see it enough to see how it matches my card.  You can see the link here on Splitcoast if you want.  I have had this Pure Innocence girl for a while but had not used her.  The sentiment I am using this week on the calendar class card.  A perfect sentiment for a calendar I think.  I really want to paper piece this girl (I know, no surprise!) but to do that, I figured out that I was going to have to cut out the flower she is holding.  Wow, that was major ... not for the faint of hand (hand instead of heart, as in the hand that cuts ... hee, hee!) But, the end result was worth it!  What do you think?  Pretty card?

Recipe:

Paper - My Minds Eye Six by Six called A Happy Heart, Cardstock Cream, Black
Stamps - My Favorite Things PI Sunflower Girl
Ink - Memento Black, Prismacolor Pencils, Gamsol
Tools - My Favorite Things Die-Namics Upsy Daisy Flowers
Other - Rhinestones by K & Co., and Queen & Co.

Check in with me tomorrow for the other card I have to show you!

Happy Stamping!
Tina

P.S. Quote for today:  "If you want to be happy, be".  - Leo Tolstoy

Saturday, January 21, 2012

Saturday's Sketch Share!

Yes, I am a little late getting this post done today.  Truthfully, I have been on the computer all morning, but that pininterest thing has sucked me in again!  Love looking at all the ideas, especially the card and papercraft ideas.  Enough about that, let's get to the important stuff for today.  Donna is participating this week, so I have three cards to show you.  I will show you mine, then Debbie's, and then Donna's, and of course, the sketch we all three used.  All the cards came out great. I know you are ready to see ... enjoy!


My Card

Debbie's Card (love how the balloons colors perfectly match the paper ... fun!)

Donna's Card (used technique of inking over images stamped in Versamark ...cool!)

The Sketch


I want to note one thing about my card.  Do you see I changed where I put the oval at the top?  Leaving it on the right side would have covered up my bunny too much, so I moved it to the left.  Originally, that was the only change I was going to make and I planned to leave the ribbon tie and tag on the right.  Leaving the ribbon on the right seemed more normal to me and gave the card, in my opinion, balance.  But, then I was thinking maybe the sketch creator was trying to do different, so I moved it to the same side as the oval.  It created an out of the box feel for me, which is always good, as it allows me to try different.  And I actually like the result!  I also want to note, that my coloring was done with Copics ... shhhh!  Don't tell anyone!  Now, I didn't do much shading and blending, but I like it.  I have bought just a few to kinda see what I think.  On one of the blogs, I saw how instead of coloring the bunny, they simply outlined the bunny with a beige marker, and that is what I did ... love the result!  The stamp, from The Cat's Pajamas, I have had for a while but had not inked up.  I hope you love it because I have several more card ideas to create with it! 

That's it for today.  Next week, is my class prepping week, but I have at least two posts to get done so you can see a couple of things that I made and sent.  And who knows, maybe the class preps will go good and I will have time to make some more cards to show you.  I have a bunch of Valentine ideas, and I have yet to make one... less than a month away ... I better get busy!  Have a great weekend and GO CREATE something!  You deserve it!

Happy Stamping!
Tina

Friday, January 20, 2012

Celebrate Good Times!

Hello!  I bet you have wondered what happened to me this week.  I have been out in my shack to create and have made a couple of cards, that got sent, and also my swap card that you will see tomorrow.  Sometimes that happens, where I make cards but I can't show you because the recipients follow my blog, so I have to wait until the recipient has it in hand.  But, I do have one that I finally got finished that I can show you.  This one I made for my hubby's grandson who is turning 15 on Sunday.  (I am safe because he does not follow my blog!)  All week I have been thinking about what stamp I could use.  First, because it's a card for a boy, second because he's a teenager, therefore,cutesy images don't work ... anyway, I finally decided to ink up the truck from Deadbeat Designs.  Pretty perfect image for him, as he will be getting his learner's permit soon, and he is a cowboy type kid, where trucks are some of his loves!  I can't believe I didn't think of it first!  Let me show you my card.  Enjoy! 


I had to get my hubby to help me take the pic of the sentiment that is behind the tailgate.  I have a few of the sentiments from Deadbeat Designs that I bought to use with the truck, like "Thought you might need a little pickup" or "Life's a Ditch".  But, these would not work for this particular card.  Will use them next time!  I did find several simple Happy Birthday sentiments that were small enough.  But, I stopped looking when I found the "Celebrate Good Times" from Verve.  I liked it because it was very bold.  I kept thinking about the quote "Let the good times roll" ... truck rolling down the highway.  Anyway, that was my thought process.  You know I very rarely make a card without a sketch.  So, for this one, I went with one you can see here.  And speaking of sketches, in a blog post that I saw today from Jen delMuro, she talks about using sketches that I found very interesting.  You can see her post here.  The part about the sketches is toward the bottom of her post.  O.k. back to my card ... I kinda wanted to put his age somewhere but the truck is so big, I didn't think I would be able to.  But in the end, I added the two stars with the rub-on numbers!  How fun is that?  What do you think of my truck card?

Recipe:

Paper - My Minds Eye Lime Twist Out of the Blue 6 x 6 pad, Cardstock White, Red, Green
Stamps - Deadbeat Designs: Truck, Outside Sentiments by Verve from Birthday Bash, Inside sentiments from Hero Arts
Ink - Memento Black, Prismacolor Pencils, Gamsol
Tools - Stampin' Up Square Lattice Folder (on right side of red panel), My Favorite Things Stacking Stars Die-namics
Other - Number Rub-Ons from American Crafts, Glossy Accents on tail lights, side mirrors, and rear view mirror (hard to see in photos)

I will be back tomorrow with the Saturday sketch share.  See you then.

Happy Stamping!
Tina

Saturday, January 14, 2012

Saturday's Sketch Share!

Hello!  I am back today with the Saturday Sketch share between Debbie and I.  Her card is very wintery and mine?  Well, I am ready to move forward to springtime!  But, it is still winter and that makes Debbie's card very pretty.  Let me show you ... here is my card, Debbie's card and the sketch we both used.  Enjoy!


My Card

Debbie's Card


The Sketch


I have a confession to make about my card.  The stamp I used is one I got this last weekend at the stamp convention and it is by Whipper Snapper which is one of the last remaining wood mounted stamp lines to have color indexing.  Well, I totally colored my caterpillar and flower almost exactly like the color indexing.  Cheater!  Oh well, it still came out pretty darn cute, wouldn't you say? 

Recipe my card:

Paper - Floral paper by The Paper Studio called Doodle Flowers (this is from my stash and it is a text-weight), Lime Dot is from Cosmo Cricket backside of Bloomin Babies, Cardstock White, Purple
Stamps - Whipper Snapper: name on stamp "Hugo" (odd name for a caterpillar?), Hello sentiment from Hero Arts
Ink - Memento Black, Prismacolor Pencils, Gamsol
Tools - Tim Holtz bracket die, EK Success scallop border punch
Other - Ribbon from Creative Impressions, Rhinestones

O.k. I am off today to the second of the two stamp conventions for the month.  Have a great weekend!

Happy Stamping!
Tina

P.S.  I have been forgetting to add the quote of the day.  And the last couple of days, they have been awesome, so here is my share:

Live with intention.
Walk to the edge.
Listen hard.  Practice wellness.
Play with Abandon.  Laugh.
Choose with no regret.
Appreciate your friends.  Continue to learn.
Do what you love.  Live as if this is all there is.          (This is one to keep and look at often).

Act happy, feel happy, be happy, without a reason in the world.
Then you can love and do what you will.                   (Love this one too)!

Friday, January 13, 2012

It's Magic!

Hello!  This is my second post right in a row, and it uses the same stamp too!  The card I am showing you in this post is a "CASE" of a card I saw and loved.  And probably, why I purchased the stamp set!  I almost always get ideas from other cardmakers but not often, do I case a card so closely to the original.  Case stands for copy and share everything and that is exactly what I have done here.  The original card was made by Jen del muro, which is one of my favorite blogs to go to, plus I had the privilege of having her teach when I had my store. So, let me show you my card.  And then I will give you the link to hers.  Enjoy!


Go here to see Jen's original card.  No, it's not exact, but it is pretty darn close.  I think her curtains were made with a die from TCP.  Mine I made with a large scallop die from Sizzix.  I also used a Spellbinders Label die for the sentiment!  But, I love my card and hers!  Thanks Jen for the inspiration!

Recipe:

Paper - No Pattern paper!  Cardstock White, Red, Black Yellow
Stamps - The Cat's Pajamas Presto!
Ink - Memento Black, Prismacolor Pencils, Gamsol
Tools - Spellbinders Labels 20 & Petite Oval, Sizzix Large Scallop Border die
Other - Rhinestones

I will be back tomorrow with the Saturday Sketch share.  See you then.
Happy Stamping!
Tina

Presto! Over the Hill!

Hello!  Today I will have two posts to show you.  I had planned on doing one yesterday and one today, but I didn't get to it, so this is the way I am going to do it.  Both posts use the same stamp, one that I got a while back but haven't had a chance to ink it up with all the holiday cardmaking.  This first card was made for my hubby's son who is turning 40 this weekend!  Wow.  Seems crazy because Gary is only 57, but that is what happens when kids have kids!  Anyway, because it is the 40th, I wanted to do an over the hill something!  I decided my new little bunny magic stamp and the word presto would go perfect with the words "you are old".  I have a LOT of stamps, but I could not find this sentiment anywhere.  Yes, I could have either done it on the computer or used some alphabet letters but when I came across a clear sticker with the sentiment, "over the hill", I went with it.  Let me show you.  Enjoy!


And the inside:


The sketch is from Sketch For You To Try for January.  Remember last year I did all 12 sketches which entered my name into the big prize on Christmas Day.  No, I didn't win, but that doesn't mean I don't want to try for it again.  Besides, I love all of Jen's sketches, and by doing them, I have many more ideas to go back to when I am at a loss for a layout.  Here is the sketch:

Often times when picking out what papers to use, I go for a collection of papers so that all the color tones match, but sometimes, like this card, you just have to pick and choose, as all three papers are from different lines.  But it worked!  What do you think, do you like how my card turned out?

Recipe:

Paper - Dots with black bkgd by My Minds Eye Lime Twist - Out of the Blue 6 x 6, Red tiny stars by Pink Paislee Hometown Summer 6 x 6 collection, Dot by Bo Bunny Paprika, Cardstock White, Black
Stamps - The Cat's Pajamas Presto!, Inside: Circle birthday wishes by Endless Creations, Happy by Hero Arts (sentiment read Happy Birthday, but I just inked Happy)
Ink - Memento Black, Prismacolor Pencils, Gamsol (Note: I colored the bunny gray, thinking of gray=old!)
Tools - Spellbinders Circles
Other - The Paper Studio Clear Sticker, Rub-on numbers by Making Memories for the 4 0 !, Pearls by Queen & Co.

I am now going to work on my second post with the same stamp so look for that one!

Happy Stamping!
Tina

Tuesday, January 10, 2012

Whisking You The Best Day Ever!

Hello!  I am back today to show you a little gift item I made for a friend.  She is a fabulous cook so originally I was thinking that I could make her a little recipe holder for the kitchen, but as it evolved it became quite glitzy and probably not the right colors for a kitchen.  But, she can use it on her desk to hold notes too.  I think she liked it.  I really enjoyed making it.  Let me show you!  Enjoy!


Here is what it looked like on the backside:
I added pattern paper on the back and around the edges, I added Lumiere Paint (from ex-Imprints stash ... it was a little thick but I added a touch of water and it helped.  I was just glad I had a color that went with it!)

And a few close ups of the front:

I popped the penguin up with some pop up dots.  The border was created with the tape from Elizabeth Crafts and their glitter called Glitz Ritz.  It is very sparkly and it feels like velvet to the touch. I then added a rhinestone in the middle of each circle for more bling.  And the penguin's coat also has rhinestones! 

I made magnets from a matching sticker sheet.  To make the stickers thicker, I adhered them to cardstock and cut around the shape.  Inexpensive magnets from Wal-mart worked perfectly.  I love the saying that says "scum-didily-umptious"! 


This is the close-up of the tab I added on the right side!

Now, I have one more thing to show you and it goes with the title of the post!  It is the card I made to match! 


In the same line of papers, there is one with recipe cards overlapping all over the whole 12 x 12 sheet. I cut this paper so that in the background you would see a recipe card with a cupcake. And then added my "whisking ..." sentiment right on top! Perfect. By the way, this "whisking" sentiment is part of the clear set I used from Inky Antics that is actually a holiday set, And the sentiment actually reads "whisking you a sweet holiday". I knew when I got the set, that penguins are not just for Christmas cards, so ... I cut the "whisking" word off of the rest of the sentiment. Now, I can use it alone or with the sweet holiday part. Knowing I would not be using the rest of the sentiment meant that I had to go find something in my stash that I could use to finish my "whisking" sentence. Hero Arts to the rescue! At the end, I also added another stamped sentiment in the corner, also by Hero Arts, to partially cover up a printed cake that looked out of place since the rest of its recipe card was cut off.  So, how do you like my little whisking penguin?


Recipe:

Paper - Bo Bunny Sweet Tooth Line, Cardstock White, Aqua (card)
Stamps - Inky Antics Baking Penguins set, Hero Arts Birthday set (card)
Ink - Memento Black, Prismacolor Pencils, Gamsol, Lumiere Paint
Tools - My Favorite Things Dainty Dots Border & Tab Die-Namics, Elizabeth Crafts Be Creative Tape & Glitz Ritz glitter, Spellbinders Classic Circles & Ribbon Tags

Other - Rhinestones, Pearls, Velvet Ribbon by My Minds Eye

That's it for me today.  I hope to be back soon with another creation.  Until then ...
Happy Stamping!
Tina

P.S. Quote for yesterday's post (I forgot):  "How old would you be if you didn't know how old you were?"  - Satchel Paige 
And today's: "Like a new bud, each day unfolds in Splendid beauty."  (that is a springtime quote to me!)

Monday, January 9, 2012

Happy Bird-Day!

Hello!  I am back today to show you one of the birthday cards I made for a friend last week.  The week after Christmas the store I teach at had a store wide sale and this die and stamp set is one of the things that came home with me!  For this card, I mostly used the die set and just used one of the sentiments from the stamp set, but I will be doing more cards where I will make sure I use more of the stamps too!  Since I the set was My Favorite Things, I am also using their current sketch for my layout.  Let me show you my card and then the sketch. Enjoy!


Didn't it come out great?  Yes, I went back to one of my favorite go to 6 x 6 pads so all the colors would go together.  I love the sketch too.  I know I will do this one again!

Recipe:

Paper - My Minds Eye Gertie 6 x 6 pad, Cardstock Pale Yellow, Dark Brown
Stamps - My Favorite Things Contempo Cage
Ink - Memento Black
Tools - My Favorite Things Contempo Cage, Upsy Daisy Die-namics, Spellbinders Classic Circle, Cuttlebug Musical Flourish
Other - Twine, Pearls & Rhinestones

Tomorrow I will be back with the other birthday card and gift I made and gave last week.  In the meantime, I hope to play with some of my new "stuff" I got last Saturday at the stamp convention.  I had a great time, especially seeing and visiting with so many of my "ex-customers"!  So many told me how much they missed my store.  And lots asked if I miss it.  And my response?  I miss the people but not the store!  That is the absolute truth!  There is a second one this weekend, and there will be more people to visit with, however, the one last weekend, is the one I see more people I know, because it is the one that was closest to where my store was.  A lot of the same vendors stay around and have booths at the second show too.  Which could be good for my pocketbook since I spent my "wad" last weekend.  It will give me time to really peruse the samples and get more ideas! 

On another note, I was talking with a friend at the convention, and she was telling me about this pininterest thing.  Well, I had heard of it, but didn't really get it!  Well ... I think I do now and I can see it is going to be addictive.  I haven't "pinned" a lot yet, but I know I will.  On the right side of my blog I am going to add a link to my pininterest boards, so you can see what I am "pinning"!  To really get started, you need to have someone send you an invite.  Email me and I will send you one ... if I am going to be addicted, you might as well join me!  I am just in the learning stage at this point.  I have yet to figure out how to put all my sample cards on that are taking up room in my computer, but that is definitely on the list.  If anyone out there knows how to do this, email me please.   
 
See you tomorrow!
Happy Stamping!
Tina

Friday, January 6, 2012

Saturday's Sketch Share!

Hello!  I am back today with this week's sketch share.  We are still working our way through Mojo Monday's sketches from 2010.  Let's get right to it!  I will show you mine, Debbie's, Donna's and the sketch we all used.  Enjoy!


My Card
Debbie's Card
Donna's Card

The Sketch
I kinda like this sketch.  What about you?   And I love my card!  This is one of the stamp sets I got back in the midst of all the holiday cardmaking so I was glad to get a chance to ink it up!  I know you will see this one again soon.  Oh chute ... you will just have to be o.k. with that!  Hee Hee!  By the way, the set I used is from The Cat's Pajamas and the papers are from one of those 6 x 6 pads from My Minds Eye. 

I am on my way to the first of two stamp conventions which are on back to back weekends.  So, I will have new ideas coming your way soon!  Have a great weekend.  I will be back early next week to share with you some birthday items that I made this week.  See you then.

Happy Stamping!
Tina

P.S.  I got one of those daily calendars with wonderful quotes, so if I can remember, I think it would be fun to share the quote of the day on my posts.  Today's quote:
"Never let a day pass that you will have cause to say, I will do better tomorrow"  Brigham Young
Love that one! 


Thursday, January 5, 2012

January Class Share!

Hello!  I have been working on my next class creations for a couple of days and I finally got them done so I wanted to share them with you.  Remember back in December I showed you the planners I made for my stamping friends that matched the desk calendars that I made them early last year?  Well, right after that, I was teaching at The Crafty Scrapper, and I brought mine for a little show and tell.  The ladies in class loved them and asked if they could make them in the next class.  So, of course, I said yes.  I have been to at least 6 Dollar Generals to make sure I have enough of the calendars, memo pads, and pens for each person.  I love how both of the projects came out.  First up is the desk calendar.  And then the planner.  Enjoy!  

And a Close-up of the front:

And the planner open:


Didn't they come out great?  The desk calendar flowers (My Favorite Things Prima Donna Petals ) are die cut from felt.  I just love this look!  The stamps used on the planner are one of those cool Hero Arts stamp and die cut sets.  So pretty!  Also part of the class, will be a surprise Valentine card or something.  When I decided January was the month for these, I also thought about that it would also be the month for Valentine creations.  So, I am adding a surprise project.  (I have some ideas, but even I haven't decided yet exactly what it will be!)   Here are the details for the class, if you are interested. 

Calendar, Planner, and Surprise! Wed. January 25th 11:00 a.m. or Sat. January 28th 2:30 p.m. $25

This class is by special request. You will create a desk calendar and a pocket planner. The calendar and pocket planner will feature products from Hero Arts and My Favorite Things. Included in your class fee is a memo pad, a post it note pack, a twelve month printed calendar, and a pen. Both of these creations will help you get you a little more organized or they could be a great gift idea. Oh, and the surprise? A Valentine creation just in time for Valentine's Day!   Please bring your adhesive of choice, plus specialty adhesive to include either 1/8" Red line tape or 1/8" Score tape (1/4" also would be helpful, but not a have to have), Foam Tape (by 3M), and small glue dots, scissors, and your preferred coloring medium (Copics, colored pencils, etc.) All other supplies provided.


I have really worked my way through my "to makes" list for the week.  I have two more birthday cards to make, but I won't be able to show you those until next week, after they are received.  I know I will be back on Saturday for the share.  Donna is participating this week, so you will have three looks with one sketch.  See you then if not before.

Happy Stamping!
Tina 

Tuesday, January 3, 2012

Happy Birthday ... Mojo Style!

Hello!  I am back already with another card creation.  On my "to make" list for the week, is a birthday card for Gary's oldest daughter.  Well, yesterday when I was going through my blog reader, I found a sketch challenge for Mojo Monday.  You know, these are the ones that Debbie, Donna, and I work with for the Saturday sketch shares.  We are working our way thru the 2010 sketches.  They continue to have new sketches, like the one I used today, and it seems like I have gotten out of the habit of doing new ones.  And I like doing the new ones.  So, as one of my resolutions, I am going to try to get back into doing some of the new ones.  Maybe I should make a goal of doing at least one current challenge per week, either from Mojo Monday or MFT or somebody. Let's get to today's card.  I will show you my card and then the sketch.  Enjoy!


I love the paper I used!  So soft, so pretty.  It is actually a Christmas pad, but I didn't think there was anything Christmasy about the papers.  But actually, if I  look very close at the floral pattern, I can see very faint snowflakes, but they are so faint, I don't think they will be an issue, but then again, it is still winter, right?  The sketch was kinda fun I thought.  Of course, it helped to have such pretty papers that all flow together!  What are your thoughts?  Do you like it?

Recipe:

Paper - Fancy Pants Designs Winterland 6 x 6, Cardstock Pale Green, Lt. Olive Green (both from ex-Imprints stash ... the cardstock colors are odd but they work here!), White
Stamps - Verve: Sentiment from Fancy Florals Remixed, and Flower from One Person
Ink - Versafine Crimson Red, JudiKins Detail Clear embossing powder (I embossed it to give it some brightness).
Tools - Spellbinders Classic Circles, MFT Leaf Die
Other - Pearls: Pink from Fab Scraps, Blue from Recollections

While I was working on this card and the Saturday sketch share card, which you can't see until Saturday, I was knowing that I was supposed to be working on my class samples.  So, that is next.  See you soon with those! 

Happy Stamping!
Tina  
 

Monday, January 2, 2012

Ahoy, Matey!

Hello 2012!  I got out to my room yesterday with a list of "to makes"!  First on the list had to be a birthday card for the youngest grandson who's birthday is on Thursday.  It's now ready to send with money inside!  Last year I know he was into the pirate theme, but even if it's "old hat", as he is getting older, I hope that he will still enjoy his pirate card!  I got this stamp months ago with him in mind and I figured now is the time!  When I knew I was going to use this stamp by My Favorite Things, I went to their blog to see what their current sketch was, so that is what I used here, with very little time to spare, as the sketch deadline is tomorrow morning.  The main image is taller than the panel shown in the sketch, but I went with it anyway!  So, I will show you my card and the sketch.  Enjoy!


I gave you a look at the inside since I added an additional sentiment from the set ... ARRR!  I love the stars dies.  This is something else I got a while back but haven't used yet.  I love this set!  Well, what do you think  about my card?  Matey, do you like it?

Recipe:

Paper - Stars and Dots from K& Co. Confetti Mat Pad, Cardstock White, Red, Lime Green
Stamps - My Favorite Things Ahoy Matey, Inside circular sentimernt from Endless Creations
Ink - Memento Black, Prismacolor Pencils, Gamsol
Tools - My Favorite Things Die-namics Stacking Stars, Ticket Tab, Dainty Dots Border, Cuttlebug Swiss Dots embossing folder
Other - Baubles from Stamping Bella

I am back to the "shack" to work on the "to makes".  A couple are for friends that I won't be able to show you until next week until after they get them, but I should be able to show you a couple of other things, like my next class samples.  So, see you in a couple of days!

Happy Stamping!
Tina 

 
design by suckmylolly.com